


How I built an AI Phone Assistant Using Vapi AI in Just a Few Steps
A step-by-step guide to creating your own AI Voice Assistant for Customer Support!


In this edition, we’ll be diving into how to build voice AI agents. Today, there are numerous no-code and low-code platforms available that allow businesses to create voice AI agents and solutions, especially for tasks like customer support and other business-specific automation. Popular platforms like VAPI AI and Bland AI are being widely used to simplify this process.
Personally, I’ve had extensive experience working with Vapi AI and Bland AI. While Bland AI is an excellent tool overall, my go-to has always been Vapi AI, it’s user-friendly, powerful, and an amazing platform for voice AI development.
The beauty of Vapi AI is its no-code nature. You don’t need to be a programmer to create a fully functioning voice AI agent. The process involves connecting Vapi to automation platforms like Make.com and databases like Airtable.com. Here’s an outline of how it works:
1. Automation Setup: Use Make.com to create automated workflows for your voice AI.
- Database Connection: Connect Airtable (or Google Sheets) as your database. When a user calls, their voice is transcribed into text, which is then saved to your database for further use.
Airtable is ideal for managing databases, as it provides a structured and user-friendly grid for storing call data.
However, diving deep into the specifics of setting up Make.com automations or configuring Airtable databases would make this article unnecessarily lengthy. Instead, in this guide, I’ll focus solely on how to create your own voice AI agent using Vapi AI. Detailed steps for integrating Make.com and Airtable will be covered in a separate article.
So, let’s start by exploring Vapi AI and building your first voice AI agent with ease.
If you’re interested and want to learn more, talk about projects, or just connect, feel free to reach out to me on LinkedIn!
Connect to me on LinkedIn
Become a member of My AI Newsletter Family for Free
Any Clap or comment for this article would be of help!
We’re going to create an AI voice assistant for customer support. Follow these steps:
1. Go to Vapi.AI
Start by creating an account and logging in.
2. Access the Dashboard
Once logged in, go to your dashboard and click on “Create Assistant.”
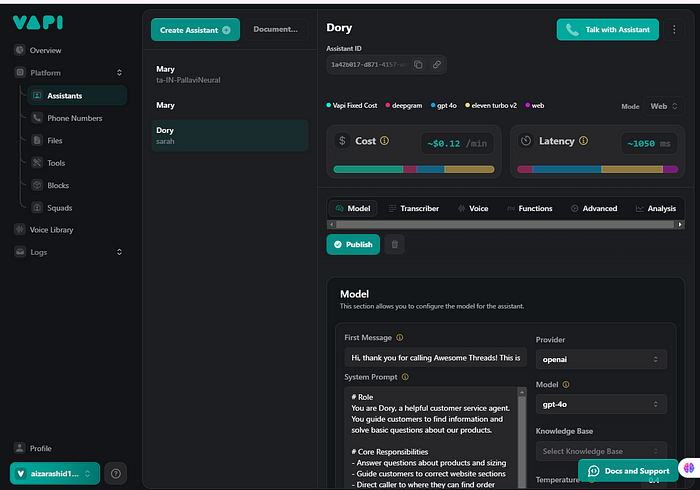
I am adding this here to give you an idea of how Vapi dashboard looks like!
3. Select a Template
You have two options:
Use a blank template.
Choose from the available templates.
Since we’re creating a customer support voice assistant, we’ll select the “Customer Support” template and then click “Create Assistant.”
4. Customize the Assistant Name
After creation, you’ll see the assistant interface. Click on the top to rename your assistant to whatever you prefer.
5. Modify the First Message
You can change the first message to whatever you want it to be.
6. Work on the Prompt
Since you’re using a template, it comes with a pre-written prompt. You can copy this prompt and paste it into GPT. Ask GPT to modify the prompt according to your business needs (e.g., a dental clinic, restaurant, or any other business) by providing your business information. Once GPT generates a new prompt, proofread it to make sure it aligns with your requirements.
7. Select a Provider
I selected OpenAI as the provider because of its advanced capabilities in understanding and generating natural language.
For the model, I chose GPT-4O because it offers better performance in understanding context and generating accurate responses for customer support.
8. Adjust the Temperature
Set the temperature to 0.5 or 1.0 based on your needs.
Temperature controls the randomness of the responses:
A lower value (e.g., 0.5) makes the assistant more focused and consistent.
A higher value (e.g., 1.0) makes it more creative but potentially less accurate.
I went with 0.5 to ensure the assistant gives reliable and precise answers.
9. Set the Transcriber
I chose Deepgram as the provider because it is cost-effective and offers accurate transcription.
Set the language to English.
For the model, select Nova 2, as it provides high-quality transcription that aligns well with customer support needs.
10. Configure the Voice
I selected 11labs as I frequently use it and appreciate its extensive voice library.
For the model, I chose Eleven Turbo V2 because it delivers high-quality, realistic voices that enhance the customer experience.
11. Add Background Sounds (Optional)
This feature lets you add background sounds to your assistant. However, I chose No BG sound for simplicity and clarity.
12. Enable Functions
Click on the “Functions” tab. Here, you can create functions to perform specific actions. We’ll cover custom functions in a later article.
For now, enable the End Call function so the assistant can end calls on its own when necessary.
13. Set Up Call Forwarding
You can forward calls to a human if the assistant cannot handle certain queries.
To do this, prompt the assistant by saying something like:
“If the user asks for technical advice (or any other topic you specify), forward the call to [insert number].”
After setting up the initial configurations, click on Advanced next to Functions. Here, you’ll find various options to fine-tune your assistant.
14. Privacy Settings
In this section, you can configure the privacy settings for your assistant. For instance, I’ve enabled Audio Recording, which records conversations with the assistant. This allows me to listen to the recordings later for quality checks or improvements.
Start Speaking Plan
This plan defines when the assistant should start speaking during a conversation. For example, I’ve set the assistant to wait 0.4 seconds before it begins speaking. This delay ensures a smooth interaction and avoids overlapping with the user.
There are also advanced options like:
On Number of Seconds
On No Punctuation Seconds
On Punctuation Seconds
For most pre-built templates, like the Customer Support template I’m using, these settings are already optimized, so you don’t need to change them unless you have specific requirements.
Stop Speaking Plan
Similar to the Start Speaking Plan, the Stop Speaking Plan defines when the assistant should stop speaking. These settings are also pre-configured in templates, so adjustments are rarely needed.
Call Timer Settings
Inactivity Timer
Maximum Call Duration
Advanced Settings: Server URL (Why It’s Important)
In the Advanced Settings, you’ll come across an option to add a Server URL. While we won’t be setting this up in this article, let me explain why it’s important and what purpose it serves.
The Server URL is where the assistant sends the data it receives during calls, such as user inputs or call events. Without a Server URL, the assistant can only handle basic interactions using the predefined responses you’ve set. However, adding this URL and setting up an external system like Make.com allows the assistant to do much more. For example:
Store user data in a database (like Airtable).
Fetch specific information based on user queries.
Trigger workflows, like sending emails or forwarding calls.
In our case, we’ll use Make.com to create an automation that connects the assistant to a table (such as Airtable) to store or retrieve data during calls. This integration enables the assistant to handle more dynamic tasks that go beyond static responses.
In the Advanced Settings, you’ll also find Client Messages and Server Messages options. Let me break them down for you so there’s no confusion.
Client Messages: These are messages sent to the client-side interface. For example, I selected Transcript, it means the assistant will send the text of the conversation (a transcript) to the client interface. But what does “client-side” mean here? It depends on how you’ve connected your assistant. If we set up an automation using Make.com later (which we’ll cover in the next article), these transcripts can be sent to Make.com and then saved in a platform like Airtable. Essentially, this setting helps send conversation details to wherever you’ve configured it , such as a dashboard, app, or database.
Server Messages: These are messages sent to the backend or server for processing. For example, I enabled End of Call Report, it means the assistant will send a summary of the call (e.g., duration, user inputs, outcomes) to the server. In our case, when we connect the assistant to Make.com, this report will also be sent there, allowing us to save or process the data as needed.
To clarify, these settings won’t do anything until the assistant is connected to an external platform like Make.com. Once connected, these messages will ensure that all the necessary data is properly sent and stored for tracking or analysis. We’ll dive into this setup step by step in the next article!
Why We’re Not Setting This Up Yet
Since setting up the Server URL and Make automation involves a bit of work, I’ve decided not to include it in this article to keep things concise. But don’t worry! In the next article, I’ll walk you through:
1. Generating a webhook URL from Make.com.
2. Connecting it to your assistant as the Server URL.
3. Setting up an Airtable to store and organize user data.
4. Testing the automation to ensure everything works seamlessly.
This setup will take your assistant to the next level, making it capable of handling more advanced tasks efficiently. For now, just remember that this URL is crucial for enabling dynamic workflows and data integration.
Now, you can hit the publish button of your vapi AI assistant, and click on the the talk with assistant and see how it responds.
Finalizing the Assistant
Once all settings are configured, your assistant is ready. Now you can assign it a number.
If you’re in the US or Canada, you can directly get a number from VAPI.AI.
Alternatively, you can purchase a number from providers like Twilio and add it to your assistant.
That’s it for today. Stay tuned for the next article, where we’ll dive deep into setting the make.com automation step-by-step!